Sunday 26 March 2017

Week 63-65 - Internal Walls

With all our external walls and doors now on it time to turn the attention to some internal walls and doors (or at least doorways) instead.

I have to admit I was feeling rather apprehensive about this: the first thing we did when we bought the place (which seems a very long time ago now – probably because it is!) was to strip the place out completely, including all the internal walls, ever since the building has been 4 large, uninterrupted spaces. Big enough to ride a bike in, play fetch with the dog or even have a full scale Irish jig rehearsal, so I was a little worried about losing the scale by dividing it up, where are we going to play fetch when its raining outside?

Luckily however it has just turned into rather more, very good size spaces and for the first time you can really see the different areas of the building and how they will interact with each other.


The ground floor walls, as with everything else in the building to keep in line with our flood defence plans are blockwork to the lower half and then timber above. I am still far too proud of myself for now being able to (very slowly) build a blockwork walls – I’m sure I will get over it soon, I promise! But I did have fun pretending to be a bricky again.


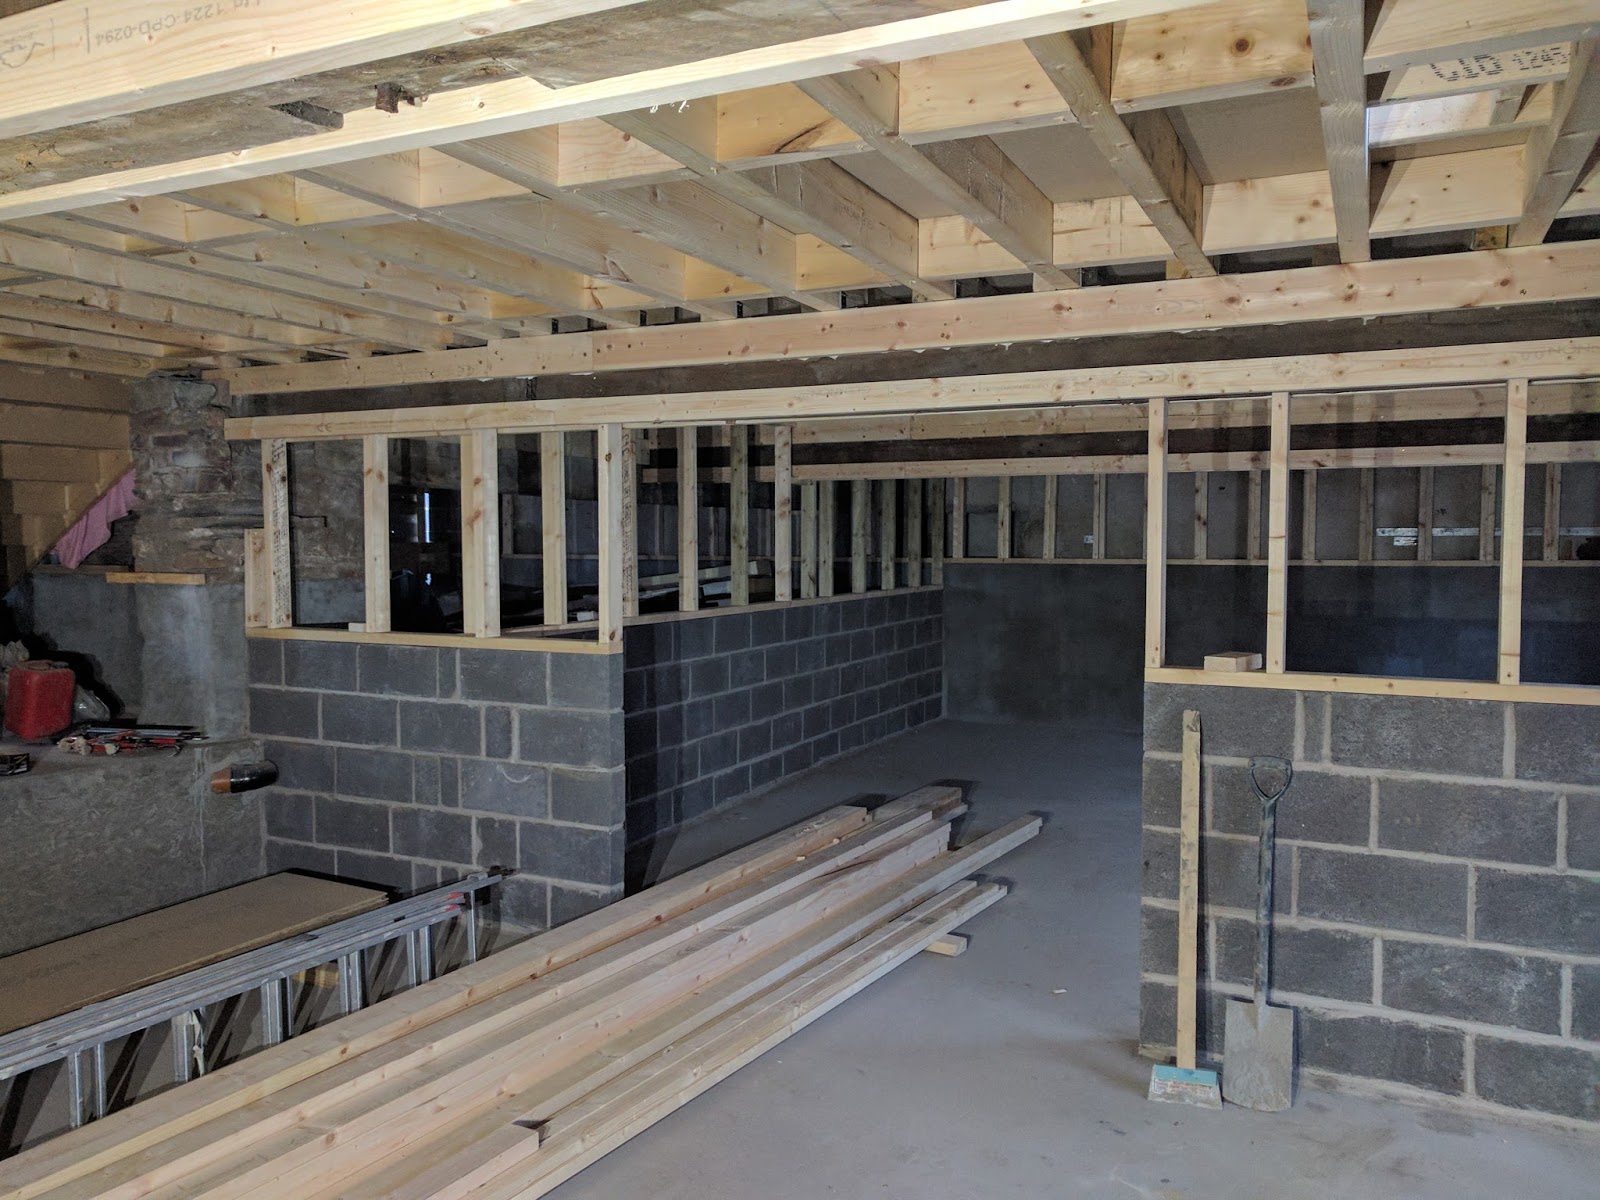
Above is the view into and then below is view out of the new clean/finishing workshop of the MOS Furniture main workshop, eventually there will be a pair of swing doors dividing these two areas. The eagle eyed among you may also find a ‘hiding Sophie’ in this picture.


The corner of the upper MOS workshop has also had the bike shed built and divided off. This is to store (as the name implies) bikes/motorbike/camping stuff etc etc. Basically anything you would normally keep in the garden shed.


You can also see the dividing walls around the customer staircase up to the gallery. This wall will have the main internal door into the workshop and viewing windows so you can spy on what I am making.


The lower blockwork wall separating the 2nd downstairs workshop off is also built; this will also eventually have viewing windows into the workshop to the upper section.


A new stud work electrical cupboard for the main workshop fuse box has also been built in the corner.


Upstairs in the gallery level we have built the studwork the divides the residential flat off from the main showroom space.


To the right of the picture you are looking at the hole for what will be the back door to the top floor flat. On this level there is a small hallway, a utility cupboard for washer and dryer and the main bathroom, the rest of the accommodation is then up the half flight of stairs on the top floor.

The left hand side of the studwork, set back a little is a kitchenette and toilet, doored off the gallery for public and commercial tenants use.


This floor has a 4 meter ceiling height which is just not needed in the bathrooms etc so I have introduced a secondary structural ceiling to this stud area which will give use an equivalent of a loft space. 

Monday 13 March 2017

Week 59-62 - External and By-fold Doors

Definition of a door: "A hinged, sliding, or revolving barrier at the entrance to a building.”

Unfortunately our old external workshop doors did none of these things well, or in fact, at all. It was therefore time to make some new ones. I am extremely glad to say that these are the last external doors I need to make for the building; however I have left the most complex to last.

These are our old doors that I am reliably informed have served a faithful 20 years and worked well. However by the time we inherited them they were feeling somewhat sorry for themselves. Then they went through a flood, had their bottoms chopped off for the pouring of the new concrete floor and have been boarded up and barely opened (even with the use of a drill and crowbar) ever since.

We have retired them to the great door showroom in the sky and replaced them with a shiny new set of by fold doors

OK, first of all I will address our colour decisions! – I do appreciate that they may not be to everyone’s taste, but I love them, and potentially more importantly, so does Sophie. The colour impact is exactly what I wanted and coupled with the gull wing shaped glazing they fit exactly the design brief I was aiming for. I do spend most of my time designing furniture for other people, unfortunately painting doors in bright multi colours is not something most of them will let you do (wimps!) , so you have to take your opportunities while you can.

Its also important to remember that this is a commercial building that we want people to visit and come inside for a look. So if they grab your attention as you walk past, whether you like them or not, they have done their job well.


At the same time I have also made the single door to the 2nd downstairs workshop and the main customer entrance door to the building. This means we officially have a working and locking door everywhere we should – no more padlocks and unscrewing temporary boarding to get in and out, yay!


The main customer entrance is in the same colours as the big front doors to my workshop and steals the same glazing design. The 2nd workshop door next door is deliberately subdued as it is not a door you (as a member of the public at least) as supposed to go through – take the hint! We have also fitted the last window at the same time to the 2nd workshop.


 Door frames glued up (by which I mean the frames of the doors, not the door frame itself - if you see what I mean!)


The voids in the frames are then filled with high performance insulation and the panel is glued on both sides. These doors account for basically one full wall of the workshop so they need to be as insulated as possible.


We made plenty of colour samples before we actually painted the doors. These is a important task - but that doesn't stop it being annoyingly time consuming and a surprisingly costly task.


Sophie spending what used to be known as a 'day off' getting the first colour coat on the doors


Old doors removed we need to make the new reveal for new doors


New doors lintel going in. This is what the doors header is attached to, so takes the weight. To make things more complicated (as usual) this lintel also needs have channels in it so water waste and supply pipes and electric cables can get from one side of the door to the other.


Finished lintel with soil pipe and water supply pipes running through it


Doors stacked up in the open possition at one side